my-notes
GitLab CI: Pipelines, CI/CD and DevOps for Beginners
Introduction
Create a repo and then add a .gitlab-ci.yml file like this:
# define the order of execution
stages:
    - prep
    - build
    - test

# list of jobs
prepare the car:
    # defining which stage this job belongs to
    stage: prep
    script:
        - mkdir build
        - touch build/car.txt
    # artifacts are kept for the next job
    artifacts:
        paths:
            - build/

author:
    stage: build
    script:
        - mkdir meta
        - echo "$GITLAB_USER_NAME" > meta/author
    artifacts:
        paths:
            - meta/

build the car:
    # multiple jobs with the same stage run in parallel
    stage: build
    script:
        - cd build
        - echo "chassis" > car.txt
        - echo "engine" >> car.txt
        - echo "wheels" >> car.txt
    artifacts:
        paths:
            - build/

test the car:
    stage: test
    script:
        - ls
        - test -f build/car.txt
        - cd build
        - cat car.txt
        - grep "chassis" car.txt
        - grep "engine" car.txt
        - grep "wheels" car.txt
        - cat ../meta/author
Notes:
- the filename must be
.gitlab-ci.yml. - the file must be in the root dir of the project.
- the Auto DevOps is NOT enabled (not sure what it means).
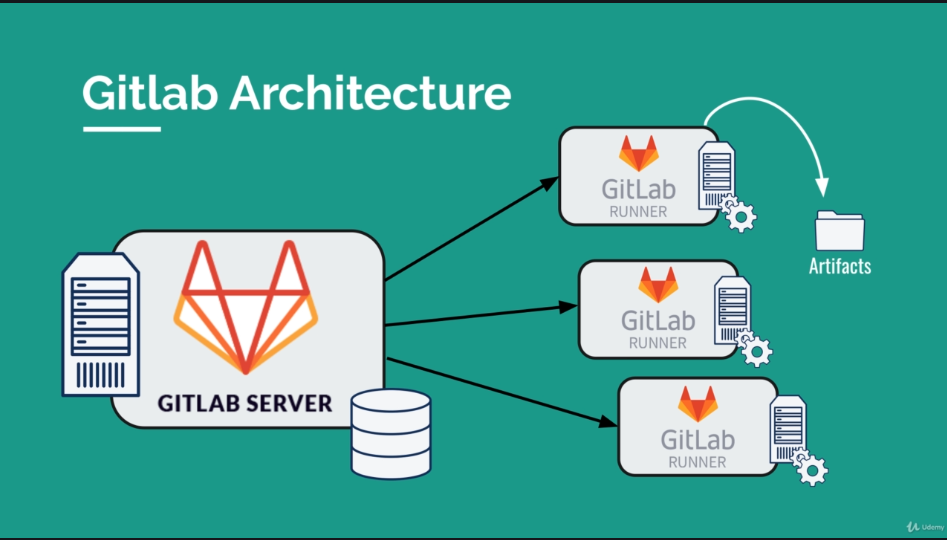
gitlab architecture

Configuring Runners:
- settings > CI/CD > Runners > Expand
Exercise with Gatsby
npm install -g gatsby-cli
gatsby new static-website
cd static-website
gatsby develop
# create a repository in gitlab called my-static-website
git remote add origin git@gitlab.com:USERNAME/my-static-website.git
git push -u origin master
# check the gitlab repo

# building locally
gatsby build
# the output of this process is placed in the public dir
ls public
Create a .gitlab-ci.yml:
image: node

stages:
  - build
  - test
  - deploy

build website:
  stage: build
  script:
    - npm install
    - npm install -g gatsby-cli
    - gatsby build
  artifacts:
    paths:
      - ./public

test artifact:
  image: alpine
  stage: test
  script:
    - grep -q "Gatsby" ./public/index.html

test website:
  stage: test
  script:
    - npm install
    - npm install -g gatsby-cli
    - gatsby serve &
    - sleep 3
    - curl "http://localhost:9000" | tac | tac | grep -q "Gatsby"

deploy to surge:
  stage: deploy
  script:
    - npm install --global surge
    - surge --project ./public --domain instazone.surge.sh
deploy in surge.sh
npm install --global surge
surge
# follow the instructions
In order to put your surge credentials in your CI config, go to:
- settings > CI/CD > Evironment variables
And then create the variables:
SURGE_LOGINwith the email you used to create an accountSURGE_TOKENwith the output of the commandsurge token
GitLab CI Fundamentals
Focusing on:
- execution speed
- git workflow
- environments (production, staging, review, etc.)
- manual steps
Predefined environment Variables
Example of useful one:
CI_COMMIT_SHORT_SHA: the first eight characters ofCI_COMMIT_SHA
CI/CD Schedules
-
left sidebar > CI/CD > Schedules
Using caches to optimize the build speed
#...
build website:
  cache:
    key: ${CI_COMMIT_REF_SLUG}
    paths:
      - node_modules/
cache.key: the key to identify the cache. Suggestion:${CI_COMMIT_REF_SLUG}cache.paths: paths to be cached
NOTE: it can also be in the global context.
WARNING!: sometimes caches misbehave and makes jobs fail. In such cases, go to the Web UI and click on the [Clear Runner Caches] button.
Cache vs. Artifacts
- Artifacts:
- is usually the output of a build tool
- designed to save some compiled/generated part of the build
- used to pass data between stages/jobs
- Cache:
- not to be used to store build results
- should only be used as a temporary storage for project dependencies
Deployment Environments
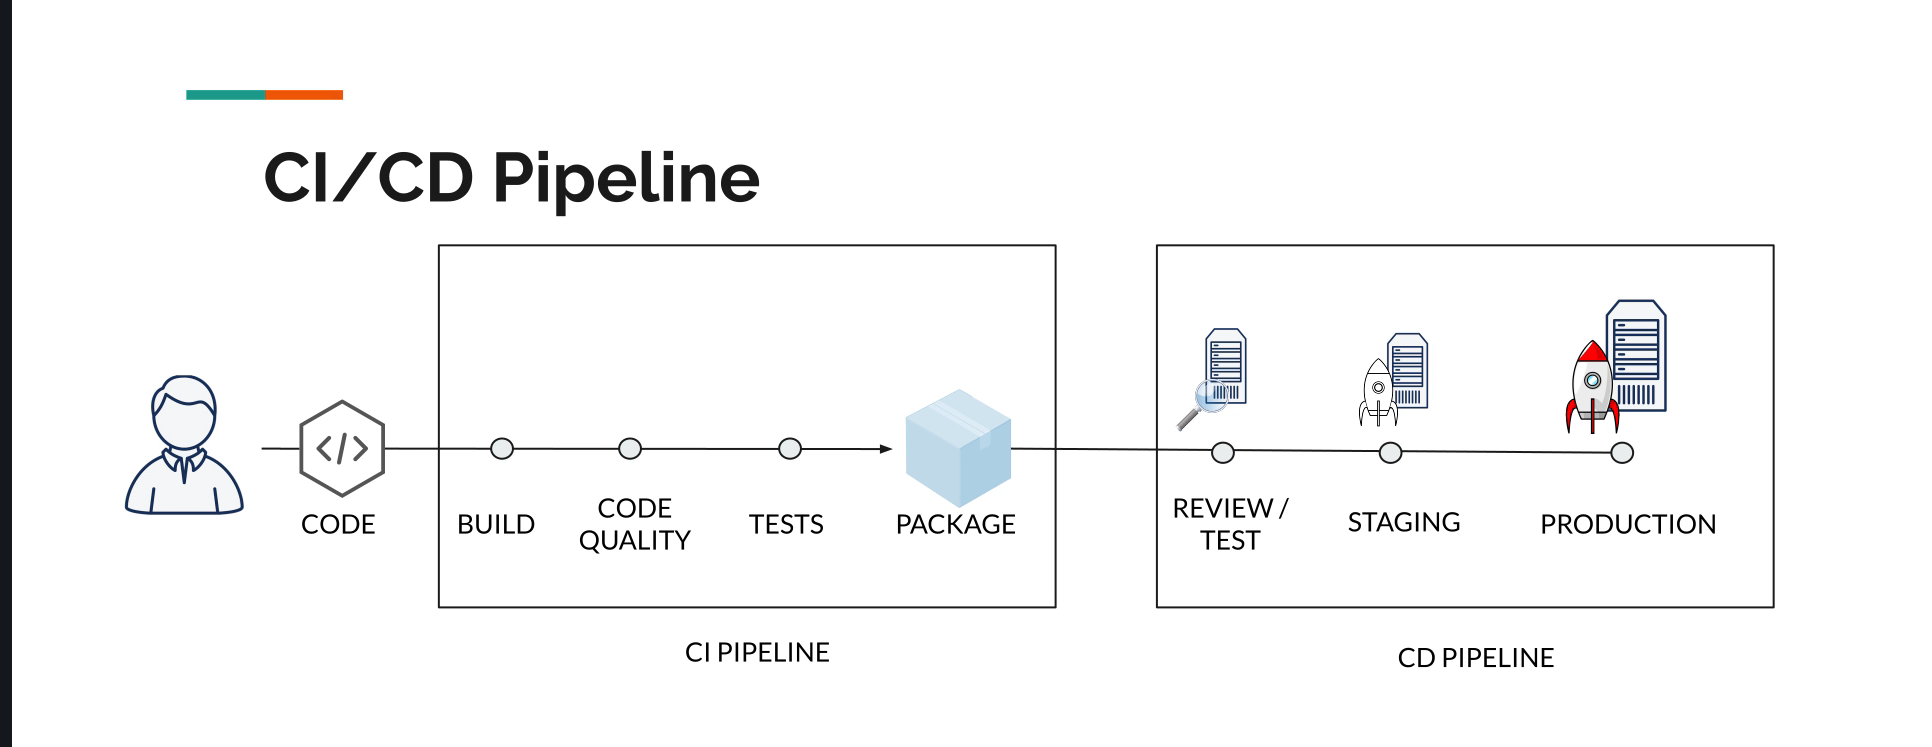
Basic pipeline:

Environments in GitLab
- allow you to control the continuous delivery/deployment process
- easily track deployments
- you will know exactly what was deployed and on which environment
- you will have a full history of your deployments
Usage example:
# ...
deploy staging:
  stage: deploy staging
  environment:
    name: staging
    url: meleu-gatsby-staging.surge.sh
  script:
    - npm install --global surge
    - surge --project ./public --domain meleu-gatsby-staging.surge.sh

deploy production:
  stage: deploy production
  environment:
    name: production
    url: meleu-gatsby.surge.sh
  script:
    - npm install --global surge
    - surge --project ./public --domain meleu-gatsby.surge.sh
# ...
After running the pipeline, go to the left sidebar -> Operations -> Environments
Variables
No mysteries, just use it like this:
variables:
  STAGING_DOMAIN: meleu-gatsby-staging.surge.sh
  PRODUCTION_DOMAIN: meleu-gatsby.surge.sh
And then you can access them as you access variables in shell scripts. Example: ${PRODUCTION_DOMAIN}.